Saturday, November 30, 2013

Peter Max at the Nassau County Museum

Looking for a great Peter Max Slide Show to share with your students?
 
Check out my photos taken at the Nassau County Museum in Roselyn, New York.  The museum is the former Frick Mansion and the grounds and sculpture gardens are lovely.

I enjoyed roaming around in the sunshine on an unusually warm and sunny late fall day in the company of my nearest and dearest friend.  Thanks so much to Barb for sharing this treasure with me and to her neighbor, Fran who gifted us with tickets to the show.  Here is my gift to you.

Wednesday, November 27, 2013

Pre-K Lions


Pre-K Lions

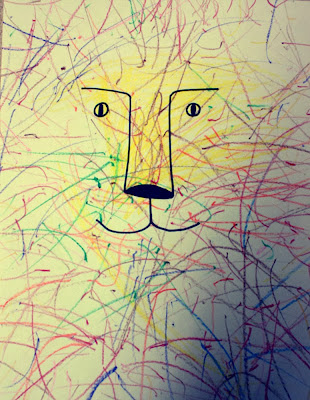
I love meeting with Pre-K each week, but these kids are little and it's a challenge to find things for the little ones that are within their capabilities and that will maintain their pint size attention span at the same time.  This project is so simple, but it was a bit hit.  Each child was given a sheet of paper with a lion face on it and used their crayons to add the mane.  Look how cute.


Friday, November 22, 2013

Middle School Name Sculptures


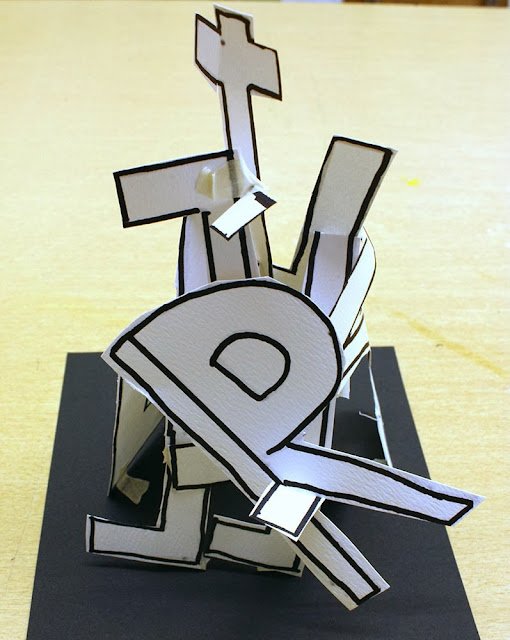
These are pretty self-explanatory.  Students, who had practiced expressive lettering styles in a previous lesson, wrote their name on a long piece of paper.  They filled their letters with color and pattern and cut each letter out then flipped the letters over to decorate the other side.  The criteria was to create a sculpture of at least 8 letters, so some students wrote their names 2 times.  Others got creative and added symbols to meet the 8 character criteria.  They were required to use the tape discretely.  The sculptures had to look good from all sides and pass the "shake test"...nothing should come loose when turned over and given a firm shake.  That's it...name sculpture.  Simple yet interesting results building and bending the flat forms into a construction.  Remind me of George Sugarman.

All art is metaphor, if one wants it that way, but then so is any object. To escape from metaphor, artists have often chosen other ways: sheer physical stimulation or the insistence on a system of formal relationships that has meaning in and for itself. Metaphor, stimulation, formal relationships, three ways to meaning. Is it necessary to choose? 
George Sugarman, 1974


Wednesday, November 20, 2013

Kindergarten Name Design


Here's a little assessment I'm using with my Kindergartners this year.  It's a name design and it will make a sweet addition to their hallway.  The skills I teach and assess in this project are:
  • Holding scissors with fingers in the large hole and thumb on top.
  • Passing scissor do a partner with blades closed in fistwith the point facing down
  • Cutting small squares from a strip using a guideline
  • Cutting small squares from a strip without a guideline
  • Opening and closing a glue bottle
  • Controlling glue bottle to produce a drop of glue

We're also reviewing primary colors and building fine motor skills.  
On day two I'll put out some sequins for students to place between their paper squares.  

These skills seem pretty basic, but believe it or not I've had fourth graders hand me a glue bottle and say it's not working because they hadn't opened it.  Yikes.  Not to mention the strange affinity children sometimes have with copious amounts of glue.  Maybe I need to repeat this lesson with some fourth graders this year?  At any rate these kids know how to open the glue bottle, close it when finished and use a reasonable amount of glue! Yay!


Little bottles for little hands.

Friday, November 15, 2013

Falling Leaf Batik

Well, I guess we've seen the last of the falling leaves around here, but leaves are still blowing and falling around the art room as third graders are finishing up their falling leave batiks. There is a lot of info out on the net about making glue batiks and I wanted to try one after seeing this this on Spoonful.  Last year this same class did a Blowing Leaf Watercolor Lesson that works up in a similar way.  My batik method is a little different than what I see others doing so I'm sharing it with you today, because it makes managing the materials very easy.


To start your batik cut your fabric to size...I used old white cotton sheeting that I had on hand.  I found my fabric up in the attic and it had some odd marks on it even after washing because it had been up there for quite a while.  The fabric doesn't have to be pristine because it's going to be painted so old sheeting works well for this you can source this at tag or second hand shops if you don't have an attic like I do.  Cut your fabric to size if you're particular.  If you're always feeling rushed to get things done then make a little snip and tear your fabric to size.  Pull away any loose strings and you'll have a soft frayed edge.

The secret to our success with this project is freezer paper.  Notice the package says plastic coated.


Cut the freezer paper to the size of your fabric.  The paper has a smooth papery side and a shiny waxy side and that's the trick.  Students design with Sharpie pens on the papery side.  For this project students drew a set of leaf templates that they arranged onto the paper and traced with the pens.  If you don't have falling leaves you can print and cut out or trace mine.  Or make whatever design you like.

Step three:  Place the waxy side of the freezer paper against the fabric and iron the two together.  The paper will stick to the fabric and the Sharpie lines will show through as you can see in the picture below.


 I use the little bottles of Elemer's glue in my classes.  Yes, they need to be refilled more frequently, but they seem more manageable for little hands and don't seem to clog as easily.  Trace over your lines with glue and let dry.  You can easily manage the project because the paper is adhered below.


You can also use Elmer's blue gel glue, but it's more expensive.  I'm using all purpose, because it's what I have on hand.  A word of note.  Have the children practice making a glue line on paper before moving their fabric.  Show them how to hold the nozzle on the fabric to get a controlled line, otherwise they may be tempted to lift the bottle up and drip the glue down which could spoil their lines.


We used warm and cool colors to work up our designs and a great occasion to review color families as well as positive and negative shapes.  We used watered down acrylic paints on these.  Make them very watery they should spread when touched to the fabric.  Paint the leaves and set aside to dry.


 Provide a selection of cool colors and paint in the negative spaces and set aside.  After the paint has dried, peel off the freezer paper, soak in warm water to wash out the glue and reaveal the beautiful white outlining. We haven't washed ours yet, but I'll post the final result when I return to school after the weekend.


Wednesday, November 6, 2013

Value Drawing...Owls

Isn't it just that way?  I went looking photos of the owl drawings my third graders did as a practice for the printmaking project below and couldn't find them.  That's because I was so blown away by the results that I forgot to photograph them.  Boo-hoo.  I guess I'll get to that later this week because their little practice sketches spontaneously turned into a 45 minute intense value drawing episode.  You could hear a pin drop. Naturally I let them go with it and then ran right over to sixth grade and repeated the lesson with my older artists, because I'll do anything to engage kids deeply with drawing.  Here are the few sixth grade value drawings that were completed last week.  Others are still in progress.


Tuesday, November 5, 2013

Printmaking for Kids

Oh, I love printmaking.  And I love sharing this media with children.  Kids I think, take to printmaking like fish to water and it has always been my experience that children with special needs, or children who struggle with fine motor skills, are drawn to printmaking like no other media.
You know I love owls.  I seem to return to this subject each year in a variety of ways.  So many cultures recognize owls for their wisdom, their mystery, and their magic.  Perhaps it's their silent flight.  Maybe it's the beautiful patterning on their feathers.  Anyway I think owls make an interesting subject for student art.  My third graders requested an owl project so I gave them this.


They began by sketching from resource photos I downloaded from the web.  Their value sketches were amazing...but that's another story.  After practicing, they created a line drawing on a half sheet of copy paper.  This was their first experience with printmaking so we talked about the differences between a print and a drawing...especially concerning color.  I stressed the importance of pattern in their design.

Their design was then taped to a Styrofoam printing plate and they drew over their lines pressing in the design.  The paper was lifted and they drew very carefully over their lines one more time to deepen them. Ticonderoga Kindergarten Pencils work great for this step with their broad rounded tip.    I help my students cut out their plate because I'm afraid of cracking, but they could probably do this step themselves.


I also attach a folded piece of tape to serve as a handle and write the student's name on the plate.  It's helpful, I think, to demonstrate the process of printing while they are in the designing phase.  Printmaking can get hectic and it's good for students to see the steps demonstrateded twice.  I especially stress the importance of keeping clean in making a successful print.

You can see my complete process here.
If you don't have a stack of scrap papers on hand... then run to your school recycle bin and pick up a few discarded magazines or catalogs.  .  Rip the cover off any catalog and lay the printing plate on page one.  Ink it up.  Tear off page one and discard.  Lay a paper on a second catalog.  Place your plate on paper.  Use a cover sheet and roll with a brayer.  Throw away the cover sheet and top sheet of the magazine and put your print on the rack.
Kids get back in line ready to print again...I teach the kids to place the plate "in the parking lot" while waiting for their next turn.  The parking lot is a waiting place on the table for printing plates so they're not walking around with inky plates.
You can use tempera paints to print.  You can mix paint with Elmer's glue.  But I use Speedball water based block printing ink for consistently good results.
Happy printing.